1. About
Description
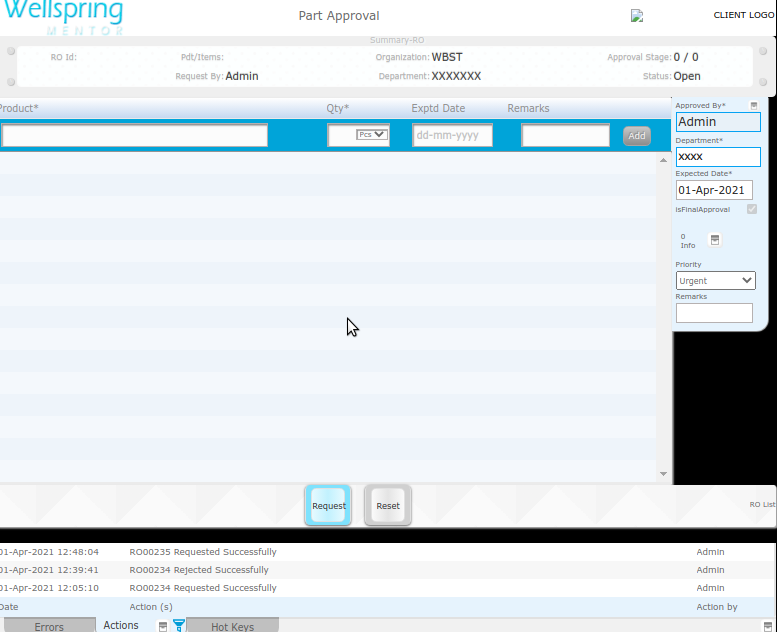
When an end User has some demand, this Interface provides the option to Request Materials to Fulfill their demands. Depending on the users, there is different stages. Once the Request has been Raised, it will start processing and only Certain users can Approve the Requested Materials. In Request Order, Link to the RO List is available. This List contains the detailed information about the Request Order. For Each and every Requesting of Materials, RO Number can be generated. So it is very helpful to know the status of the particular Requested Materials. RO Contains the Additional Information, where we can save the Additional data about the Requested Materials.
Gallery
Contents
  1. About
  2. Data
  3. Actions
  4. HowTo Videos
How to open this Interface


# How to navigate to "Fulfill RO" web page
Steps Instructions Visuals
1 Login Login using your user id and password. (If you do not know your user id / password please contact your Coordinator)
2 Click this Button Open the menu by clicking the “Green button” on the bottom-right corner
3 Open this APP Open this app by clicking the “Fulfill RO” icon from Menu
2. Data (Related to this Interface)
#
Name
Description
Type
Field Type
Criteria
Source
1
Product
Name of the Product
Text
Instant Search
Only the availabe Products can be selected
Setup Product
2
Quantity
Number of Items required
Decimal
Text Box
Quantity can be entered manually
3
Units
The Product's measure unit
Text
Drop Down
The units applicable for the product will be displayed
Setup Product
4
Expected date
The Product expected Date
Date
Date Picker
Future date or current date can be selected
5
Request By
The Employee for whom the Product is required
Text
Instant Search
Only the available Employee can be selected
User Control Panel - People
6
Fullfillby
In which method the product is going to be fulfilled
Text
Drop Down
Select atleast one of the fullfill method
7
Remarks
Remarks about the each Product
Text
Text Box
Remarks is optional and can be entered manually
8
Request By
The Product requested department Name
Text
Auto Fill
The Requested By will be auto displayed
User Control Panel - People
9
For Department
The Product required department name
Text
Instant Search
Only the available department can be selected
10
Expected date
The whole Product expected date
Date
Date Picker
Future date or current date can be selected
11
Upload Files - Reference Type
Support document Refrence type
Button
Upload Button
Selected RO file will be displayed
12
Upload Files - Reference No
Support document Refrence Number
Button
Upload Button
Selected Refrence Number will be displayed
13
Upload Files - Choose File
Support document Refrence file
Button
Upload Button
Selected file will be uploaded
14
Upload Files-Refrence date
Support document Refrence date
Button
Upload Button
Selected refrence date will be displayed
15
Additional info - To
The Additional Info-To Details
Text
Text Box
The Additional Info-To Details Should get Entered Manually
16
Additional info-Through
The Additional Info-Through Details
Text
Text Box
The Additional Info-Through Details Should get Entered Manually
17
Additional info-Description
The Additional Info-Description Details
Text
Text feild
The Additional Info-Description Details Should get Entered Manually
18
Additional info-Subject
The Additional Info-Subject Details
Text
Text Box
The Additional Info-Subject Details Should get Entered Manually
19
Additional info-letter date
The Additional Info-Letter Date Details
Date
Date picker
The Additional Info-Letter Date Details Should get Selected from Date Picker
20
Additional info - From
The Additional Info-from Details
Text
Text Box
The Additional Info-From Details Should get Entered Manually
21
Product
The Product
AlphaNumeric
Instance Search
The Product Entered Manually
23
Qty
The Qty
Number
Text Box
Automatically The Count Get Shown In "Qty" Column
24
Exptd Date
The Exptd Date
Date
Date Picker
The Exptd Date Entered Manually
25
Qty Units
The Qty Units
Text
Drop Down
The user can change the display Pro of the Qty Units by selecting the values in "Part Approval"
3. Actions (Related to this Interface)
# Name IN OUT
Input Trigger Criteria Output Direct Indirect
1 Add items
  1. Product
  2. Quantity
  3. Expected Date
  4. Req By
  5. Fulfill By
  6. Remarks
Add button Product, Quantity and Requested By are mandatory fields Selected product and thier details will be added into the list
2 Edit Items
  1. Product
  2. Quantity
  3. Expected Date
  4. Req By
  5. Fulfill By
  6. Remarks
Edit button Product, Quantity and Requested By are mandatory fields Selected product and their details can be edited
3 Delete Items
  1. Product
  2. Quantity
  3. Expected Date
  4. Req By
  5. Fulfill By
  6. Remarks
Delete Button Product, Quantity and Requested By are mandatory fields Selected Product and their details will be deleted
4 Save Items
  1. Product
  2. Quantity
  3. Expected Date
  4. Req By
  5. Fulfill By
  6. Remarks
Save button Product, Quantity and Requested By are mandatory fields Selected Product details will be edited and saved
5 Upload Files
  1. Reference Type
  2. Reference Date
  3. Choose File
  4. Upload Button
Upload button Only png, jpeg and pdf format files will be uploaded The selected file will be uploaded
6 Add Upload Files
  1. Reference Type
  2. Reference Date
  3. Choose File
  4. Upload Button
Add button The file must be uploaded Reference Number The uploaded file will be added into the list
7 View Files
  1. Reference Type
  2. Reference Date
  3. Choose File
  4. Upload Button
View File Only the added Files can be viewed The uploaded file will be displayed in preview form
8 Download Files
  1. Reference Type
  2. Reference Date
  3. Choose File
  4. Upload Button
Download button Only the added Files can be downloaded The uploaded file will be downloaded
9 Request
  1. Product
  2. Quantity
  3. Expected Date(Individual Item)
  4. Req By
  5. Fulfill By
  6. Remarks(Individual item)
  7. For Department
  8. Expected Date
  9. Upload File
  10. Priority
  11. Remarks
  12. Additional Info
Request Product, Quantity, Requested By,For Department and Expected Date are mandatory fields and alteast one product must be added RO Number The generated RO will be sent for approval. If the request order is marked as "Final Approval" then the RO will be sent for Fulfill RO
10 Approve All the field are already filled by the requested user Approve The Approve button will be displayed if the user has the "Approve access". The User Acess can be modified in Setup Access The requested order will be approved and sent to Fulfill RO for fulfillment
11 Reject All the field are already filled by the requested user Reject The Reject button will be displayed if the user has the "Reject access". The User Acess can be modified in Setup Access The requested order will be rejected
12 Cancel All the field are already filled by the requested user Cancel The requested user only able to cancel the requested order The requested order will be cancelled and the status will be changed as "Cancelled"
13 Add
  1. Product
  2. Qty
  3. Exptd Date
Add Button Their must be atleast one Filter Criteria Value must be added in "Criteria List"
14 Request Part Approval Should Added In List Request Button Part Approval Should Added In List Success Message Shown Below
15 Reset Part Approval Should Added In List Reset Button Part Approval Should Added In List Request Data Get Cleared From "Part Approval"
4. How To Videos